Showing posts with label hack utility. Show all posts

Thursday, January 28, 2010

Access PassView 1.12 Copyright (c) 2000 - 2002


Description

This utility reveals the database password of every password-protected mdb file that created with Microsoft Access 95/97/2000/XP or with Jet Database Engine 3.0/4.0 . It can be very useful if you forgot your Access Database password and you want to recover it.

Known Limitations

  • In Access 2000/XP files, this utility cannot recover passwords that contains more than 18 characters.
  • This utility shows only the main database password. It cannot recover the user-level passwords.

Disclaimer

The software is provided "AS IS" without any warranty, either expressed or implied, including, but not limited to, the implied warranties of merchantability and fitness for a particular purpose. The author will not be liable for any special, incidental, consequential or indirect damages due to loss of data or any other reason.

Using Access PassView

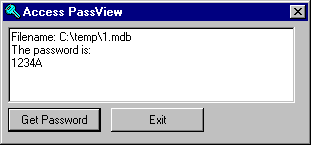
Using the Access PassView utility is very simple. it doesn't need any installation process or additional DLL files. You can run the "accesspv.exe" file from any directory you want, and start to work. In order to get the password from your mdb file, click the "Get Password" button, select the mdb file and the password will be shown in the main text box.

There are also 2 alternative ways for getting the password of mdb file:

  1. Drag & Drop: You can get the password of your mdb file by dragging it from the explorer window into the Access PassView window.
  2. Command-line: You can get the password of your mdb file by adding the filename as command-line parameter.
    For example:
    accesspv.exe c:\access\mymdb.mdb

Feedback

If you have any problem, suggestion, comment, or you found a bug in my program, you can send a message to
vikas.jain1582@gmail.com

Download Location:

http://rapidshare.com/files/342394678/accesspv.zip

LSASecretsDump v1.21 Copyright (c) 2006 - 2009

Description

LSASecretsDump is a small console application that extract the LSA secrets from the Registry, decrypt them, and dump them into the console window.
The LSA secrets key is located under HKEY_LOCAL_MACHINE\Security\Policy\Secrets and may contain your RAS/VPN passwords, Autologon password, and other system passwords/keys.

Disclaimer

The software is provided "AS IS" without any warranty, either expressed or implied, including, but not limited to, the implied warranties of merchantability and fitness for a particular purpose. The author will not be liable for any special, incidental, consequential or indirect damages due to loss of data or any other reason.

Using LSASecretsDump

LSASecretsDump is a console application, so in order the view the output, you have to run it in console (Command-Prompt) window.
As with any console application, you dump the output into a file, for example:
LSASecretsDump.exe > c:\temp\lsa.txt

Command-Line Options

-external Dump the LSA secrets from external instance of Windows installation. For example:
LSASecretsDump.exe -external p:\windows
-emptydump also empty items.

System Requirement

This utility works on Windows 2000/XP/2003/2008/Vista/7. Windows 98/ME is not supported.

Feedback

If you have any problem, suggestion, comment, or you found a bug in my utility, you can send a
vikas.jain1582@gmail.com

Download Location:

http://rapidshare.com/files/342393360/lsasecretsdump.zip

http://rapidshare.com/files/342393718/lsasecretsdump-x64.zip

LSASecretsView v1.21 - View LSA secrets stored on your computer Copyright (c) 2006 - 2009


Description

LSASecretsView is a small utility that displays the list of all LSA secrets stored in the Registry on your computer.
The LSA secrets key is located under HKEY_LOCAL_MACHINE\Security\Policy\Secrets and may contain your RAS/VPN passwords, Autologon password, and other system passwords/keys.

Disclaimer

The software is provided "AS IS" without any warranty, either expressed or implied, including, but not limited to, the implied warranties of merchantability and fitness for a particular purpose. The author will not be liable for any special, incidental, consequential or indirect damages due to loss of data or any other reason.

Known Problems

False Alert Problems: Some Antivirus programs detect this utility as infected with Trojan/Virus.

Using LSASecretsView

LSASecretsView doesn't require any installation process or additional DLLs. Just copy the executable file (LSASecretsView.exe) to any folder you like, and run it.
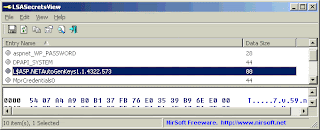
The main window of LSASecretsView contains 2 panes: The upper pane displays the list of all LSA secret entries. When you select one or more items in the upper pane, the lower pane displays the LSA data of the selected items, in Hex and Ascii formats.

Reading LSA secrets from external instance of Windows (Windows 2000/XP/2003)

Starting from version 1.20, LSASecretsView allows you to read the LSA secrets from external instance of Windows. This feature can be useful if you have a dead system that cannot boot anymore. You can use this feature from the user-interface, by using the 'Advanced Options' in the File menu, or from command-line, by using /external parameter, for example:
LSASecretsView.exe /external g:\windows

System Requirement

This utility works on 2000/XP/2003/2008/Vista/7. Windows 98/ME is not supported.

Translating LSASecretsView to other languages

In order to translate LSASecretsView to other language, follow the instructions below:
  1. Run LSASecretsView with /savelangfile parameter:
    LSASecretsView.exe /savelangfile
    A file named LSASecretsView_lng.ini will be created in the folder of LSASecretsView utility.
  2. Open the created language file in Notepad or in any other text editor.
  3. Translate all string entries to the desired language. Optionally, you can also add your name and/or a link to your Web site. (TranslatorName and TranslatorURL values) If you add this information, it'll be used in the 'About' window.
  4. After you finish the translation, Run LSASecretsView, and all translated strings will be loaded from the language file.
    If you want to run LSASecretsView without the translation, simply rename the language file, or move it to another folder.

Feedback

If you have any problem, suggestion, comment, or you found a bug in my utility, you can send a message to
vikas.jain1582@gmail.com

Download Location:

http://rapidshare.com/files/342392222/lsasecretsview.zip
http://rapidshare.com/files/342392469/lsasecretsview-x64.zip

Remote Desktop PassView v1.01 - Recover the password of Remote Desktop Connection utility Copyright (c) 2006 - 2007


Description

Remote Desktop PassView is a small utility that reveals the password stored by Microsoft Remote Desktop Connection utility inside the .rdp files

Disclaimer

The software is provided "AS IS" without any warranty, either expressed or implied, including, but not limited to, the implied warranties of merchantability and fitness for a particular purpose. The author will not be liable for any special, incidental, consequential or indirect damages due to loss of data or any other reason.

Using Remote Desktop PassView

Remote Desktop PassView doesn't require any installation process or additional DLL files. Just copy the executable (rdpv.exe) to any folder you like, and run it. After you run rdpv.exe, the main window display the passwords of .rdp located under your "My Documents" folder. The default .rdp file (Default.rdp) is usually stored in this location
If you want to recover that password of another .rdp file, just drag the file from Explorer into the window of Remote Desktop PassView utility or use the "Open .rdp File" option from the File menu.
Be aware that Remote Desktop PassView can only recover the passwords created by your current logged on user. It cannot recover the passwords of .rdp files created by other users.

Translating Remote Desktop PassView To Another Language

Remote Desktop PassView allows you to easily translate all menus, dialog-boxes, and other strings to other languages.
In order to do that, follow the instructions below:
  1. Run Remote Desktop PassView with /savelangfile parameter:
    rdpv.exe /savelangfile
    A file named rdpv_lng.ini will be created in the folder of Remote Desktop PassView utility.
  2. Open the created language file in Notepad or in any other text editor.
  3. Translate all menus, dialog-boxes, and string entries to the desired language.
  4. After you finish the translation, Run Remote Desktop PassView, and all translated strings will be loaded from the language file.
    If you want to run Remote Desktop PassView without the translation, simply rename the language file, or move it to another folder.

Feedback

If you have any problem, suggestion, comment, or you found a bug in my utility, you can send a message to
vikas.jain1582@gmail.com

Download Location:

http://rapidshare.com/files/342390353/rdpv.zip

PstPassword v1.12 - Recover lost password of Outlook PST file. Copyright (c) 2006


Description

PstPassword is a small utility that recover lost password of Outlook .PST (Personal Folders) file.

Password Encryption in PST File

The password encryption in the PST file is very weak, and for each password-protected PST file, there are many passwords that can open it.
PstPassword provides 3 different passwords for each password-protected PST file. It's possible that one of them will be the origianl password that you typed, and it's also possible that none of these passwords will be identical to the original one. However, all 3 passwords provided by PstPassword will open the PST file without problems.
For more interesting facts about the PST password encryption, click here.

Using PstPassword

PstPassword doesn't require any installation process or additional dll files. In order to start using it, just run the executable file, PstPassword.exe
After you run PstPassword, the main window displays the list of all PST files of the current logged on user (Under Documents and Settings\User Name\Local Settings\Application Data\Microsoft\Outlook). For each password-protected PST file, PstPassword provide 3 alternative passwords that will open the PST file. If the PST is not protected by a password, the 3 password columns remain empty, and the CRC value column is 0x00000000.
If you want to recover a password of PST file that doesn't appear in the default list, you can press F7 and select the desired PST file, or simply drag the PST file from Explorer window into the main window of PstPassword.
If from some reason PstPassword fails to read a PST file, an error message is displayed under the error column, and the item is painted with pink color.

Command-Line Options

/stext Save the list of PST passwords into a regular text file.
/stab Save the list of PST passwords into a tab-delimited text file.
/scomma Save the list of PST passwords into a comma-delimited text file.
/stabular Save the list of PST passwords into a tabular text file.
/shtml Save the list of PST passwords into HTML file (Horizontal).
/sverhtml Save the list of PST passwords into HTML file (Vertical).
/sxml Save the list of PST passwords to XML file.
/pstpath Specify the folder that contains the PST files. If you don't specify this parameter, the default Outlook path is used.
/pstfiles ...Specify one or more pst files to load.

Examples:
PstPassword.exe /stab "c:\temp\pass.txt"
PstPassword.exe /stab "c:\temp\pass.txt" /pstpath "c:\temp\pst-files"
PstPassword.exe /scomma "c:\temp\pass.txt" /pstfiles "c:\temp\pst-files\pst1.pst" "c:\temp\pst-files\pst2.pst" "c:\temp\pst-files\pst3.pst"

Translating PstPassword To Another Language

PstPassword allows you to easily translate all menus, dialog-boxes, and other strings to other languages.
In order to do that, follow the instructions below:
  1. Run PstPassword with /savelangfile parameter:
    PstPassword.exe /savelangfile
    A file named PstPassword_lng.ini will be created in the folder of PstPassword utility.
  2. Open the created language file in Notepad or in any other text editor.
  3. Translate all menus, dialog-boxes, and string entries to the desired language.
  4. After you finish the translation, Run PstPassword, and all translated strings will be loaded from the language file.
    If you want to run PstPassword without the translation, simply rename the language file, or move it to another folder.

License

This utility is released as freeware. You are allowed to freely distribute this utility via floppy disk, CD-ROM, Internet, or in any other way, as long as you don't charge anything for this. If you distribute this utility, you must include all files in the distribution package, without any modification !

Disclaimer

The software is provided "AS IS" without any warranty, either expressed or implied, including, but not limited to, the implied warranties of merchantability and fitness for a particular purpose. The author will not be liable for any special, incidental, consequential or indirect damages due to loss of data or any other reason.

Feedback

If you have any problem, suggestion, comment, or you found a bug in my utility, you can send a message to
vikas.jain1582@gmail.com

Download Location:

http://rapidshare.com/files/342389176/pstpassword.zip

Mail PassView v1.52 - Extract lost email passwords Copyright (c) 2003 - 2009


Description

Mail PassView is a small password-recovery tool that reveals the passwords and other account details for the following email clients:
  • Outlook Express
  • Microsoft Outlook 2000 (POP3 and SMTP Accounts only)
  • Microsoft Outlook 2002/2003/2007 (POP3, IMAP, HTTP and SMTP Accounts)
  • Windows Mail
  • Windows Live Mail
  • IncrediMail
  • Eudora
  • Netscape 6.x/7.x (If the password is not encrypted with master password)
  • Mozilla Thunderbird (If the password is not encrypted with master password)
  • Group Mail Free
  • Yahoo! Mail - If the password is saved in Yahoo! Messenger application.
  • Hotmail/MSN mail - If the password is saved in MSN/Windows/Live Messenger application.
  • Gmail - If the password is saved by Gmail Notifier application, Google Desktop, or by Google Talk.

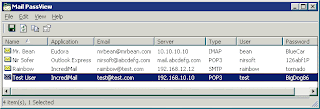
For each email account, the following fields are displayed: Account Name, Application, Email, Server, Server Type (POP3/IMAP/SMTP), User Name, and the Password.


Using the Mail PassView utility

This utility is a standalone executable. It doesn't require any installation process or additional DLLs. Just run the executable (mailpv.exe) and watch the list of your email accounts. You can save the accounts information into a text file or copy them to the clipboard.

You can also save the email accounts information by using the following command-line options:

/stext Save all email accounts into a regular text file.
/stab Save all email accounts into a tab-delimited text file.
/scomma Save all email accounts into a comma-delimited text file.
/stabular Save all email accounts into a tabular text file.
/shtml Save all email accounts into HTML file.
/sverhtml Save all email accounts into HTML file. (vertical)
/sxml Save all email accounts into XML file.
/sort This command-line option can be used with other save options for sorting by the desired column. If you don't specify this option, the list is sorted according to the last sort that you made from the user interface. The parameter can specify the column index (0 for the first column, 1 for the second column, and so on) or the name of the column, like "Email" and "Name". You can specify the '~' prefix character (e.g: "~Email") if you want to sort in descending order. You can put multiple /sort in the command-line if you want to sort by multiple columns.

Examples:
mailpv.exe /shtml "f:\temp\pass.html" /sort 2 /sort ~1
mailpv.exe /shtml "f:\temp\pass.html" /sort "~Application" /sort "Name"

/nosort When you specify this command-line option, the list will be saved without any sorting.

Notice: If the filename contains one or more space characters, you must enclose it with quotes ("").

Translating Mail PassView to other languages

Mail PassView allows you to easily translate all dialog-boxes, menus, and strings to other language.
In order to do that, follow the instructions below:
  1. Run Mail PassView with /savelangfile parameter:
    mailpv.exe /savelangfile
    A file named mailpv_lng.ini will be created in the folder of Mail PassView utility.
  2. Open the created language file in Notepad or in any other text editor.
  3. Translate all menus, dialog-boxes, and string entries to the desired language.
  4. After you finish the translation, Run Mail PassView, and all translated strings will be loaded from the language file.
    If you want to run Mail PassView without the translation, simply rename the language file, or move it to another folder.

Feedback

If you have any problem, suggestion, comment, or you found a bug in my utility, you can send a message to
vikas.jain1582@gmail.com

Download Location:

http://rapidshare.com/files/342387932/mailpv.zip

ChromePass v1.05 Copyright (c) 2008


Description

ChromePass is a small password recovery tool that allows you to view the user names and passwords stored by Google Chrome Web browser. For each password entry, the following information is displayed: Origin URL, Action URL, User Name Field, Password Field, User Name, Password, and Created Time.
You can select one or more items and then save them into text/html/xml file or copy them to the clipboard.

Using ChromePass

ChromePass doesn't require any installation process or additional DLL files. In order to start using ChromePass, simply run the executable file - ChromePass.exe After running it, the main window will display all passwords that are currently stored in your Google Chrome browser.

Reading ChromePass passwords from external drive

Starting from version 1.05, you can also read the passwords stored by Chrome Web browser from an external profile in your current operating system or from another external drive (For example: from a dead system that cannot boot anymore). In order to use this feature, you must know the last logged-on password used for this profile, because the passwords are encrypted with the SHA hash of the log-on password, and without that hash, the passwords cannot be decrypted.
You can use this feature from the UI, by selecting the 'Advanced Options' in the File menu, or from command-line, by using /external parameter. The user profile path should be something like "C:\Documents and Settings\admin" in Windows XP/2003 or "C:\users\myuser" in Windows Vista/2008.

Command-Line Options

/stext Save the list of passwords into a regular text file.
/stab Save the list of passwords into a tab-delimited text file.
/scomma Save the list of passwords into a comma-delimited text file.
/stabular Save the list of passwords into a tabular text file.
/shtml Save the list of passwords into HTML file (Horizontal).
/sverhtml Save the list of passwords into HTML file (Vertical).
/sxml Save the list of passwords to XML file.
/external Load the Chrome passwords from external drive/profile. For example:
chromepass.exe /external "C:\Documents and Settings\admin" "MyPassword"

Translating ChromePass to other languages

In order to translate ChromePass to other language, follow the instructions below:
  1. Run ChromePass with /savelangfile parameter:
    ChromePass.exe /savelangfile
    A file named ChromePass_lng.ini will be created in the folder of ChromePass utility.
  2. Open the created language file in Notepad or in any other text editor.
  3. Translate all string entries to the desired language. Optionally, you can also add your name and/or a link to your Web site. (TranslatorName and TranslatorURL values) If you add this information, it'll be used in the 'About' window.
  4. After you finish the translation, Run ChromePass, and all translated strings will be loaded from the language file.
    If you want to run ChromePass without the translation, simply rename the language file, or move it to another folder.

License

This utility is released as freeware. You are allowed to freely distribute this utility via floppy disk, CD-ROM, Internet, or in any other way, as long as you don't charge anything for this. If you distribute this utility, you must include all files in the distribution package, without any modification !

Disclaimer

The software is provided "AS IS" without any warranty, either expressed or implied, including, but not limited to, the implied warranties of merchantability and fitness for a particular purpose. The author will not be liable for any special, incidental, consequential or indirect damages due to loss of data or any other reason.

Feedback

If you have any problem, suggestion, comment, or you found a bug in my utility, you can send a
vikas.jain1582@gmail.com

Download Location:

http://rapidshare.com/files/342386968/chromepass.zip

PasswordFox v1.20 - Extract the user names/passwords stored in Firefox Copyright (c) 2008 - 2010


Description

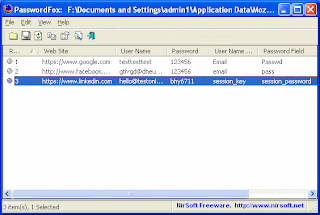
PasswordFox is a small password recovery tool that allows you to view the user names and passwords stored by Mozilla Firefox Web browser. By default, PasswordFox displays the passwords stored in your current profile, but you can easily select to watch the passwords of any other Firefox profile. For each password entry, the following information is displayed: Record Index, Web Site, User Name, Password, User Name Field, Password Field, and the Signons filename.

Using PasswordFox

PasswordFox doesn't require any installation process or additional DLL files. However, Firefox browser must be installed on your computer in order allow PasswordFox to grab the passwords list.
In order to start using PasswordFox, simply run the executable file - PasswordFox.exe
After running it, the main window will display all your passwords list for the last profile that you used. If PasswordFox chose the wrong profile folder, you can use the 'Select Profile Folder' option to choose the right one.

Command-Line Options

/profile Choose the desired Firefox profile folder.
/installfolder Choose the desired Firefox installation folder.
/master Specify the master password.
/stext Save the list of Firefox passwords into a regular text file.
/stab Save the list of Firefox passwords into a tab-delimited text file.
/scomma Save the list of Firefox passwords into a comma-delimited text file.
/stabular Save the list of Firefox passwords into a tabular text file.
/shtml Save the list of Firefox passwords into HTML file (Horizontal).
/sverhtml Save the list of Firefox passwords into HTML file (Vertical).
/sxml Save the list of Firefox passwords to XML file.
/sort This command-line option can be used with other save options for sorting by the desired column. If you don't specify this option, the list is sorted according to the last sort that you made from the user interface. The parameter can specify the column index (0 for the first column, 1 for the second column, and so on) or the name of the column, like "Web Site" and "User Name". You can specify the '~' prefix character (e.g: "~User Name") if you want to sort in descending order. You can put multiple /sort in the command-line if you want to sort by multiple columns.

Examples:
PasswordFox.exe /shtml "f:\temp\pw.html" /sort 2 /sort ~1
PasswordFox.exe /shtml "f:\temp\pw.html" /sort "Web Site" /sort "User Name"

/nosort When you specify this command-line option, the list will be saved without any sorting.

Translating PasswordFox to other languages

In order to translate PasswordFox to other language, follow the instructions below:
  1. Run PasswordFox with /savelangfile parameter:
    PasswordFox.exe /savelangfile
    A file named PasswordFox_lng.ini will be created in the folder of PasswordFox utility.
  2. Open the created language file in Notepad or in any other text editor.
  3. Translate all string entries to the desired language. Optionally, you can also add your name and/or a link to your Web site. (TranslatorName and TranslatorURL values) If you add this information, it'll be used in the 'About' window.
  4. After you finish the translation, Run PasswordFox, and all translated strings will be loaded from the language file.
    If you want to run PasswordFox without the translation, simply rename the language file, or move it to another folder.

License

This utility is released as freeware. You are allowed to freely distribute this utility via floppy disk, CD-ROM, Internet, or in any other way, as long as you don't charge anything for this. If you distribute this utility, you must include all files in the distribution package, without any modification !

Disclaimer

The software is provided "AS IS" without any warranty, either expressed or implied, including, but not limited to, the implied warranties of merchantability and fitness for a particular purpose. The author will not be liable for any special, incidental, consequential or indirect damages due to loss of data or any other reason.

Feedback

If you have any problem, suggestion, comment, or you found a bug in my utility, you can send a message to
vikas.jain1582@gmail.com

Dwnload Location:

http://rapidshare.com/files/342384979/passwordfox.zip

IE PassView v1.17 - Recover lost passwords stored by Internet Explorer Copyright (c) 2006 - 2009


Description

IE PassView is a small password management utility that reveals the passwords stored by Internet Explorer Web browser, and allows you to delete passwords that you don't need anymore. It supports all versions of Internet Explorer, from version 4.0 and up to 8.0.
For each password that is stored by Internet Explorer, the following information is displayed: Web address, Password Type (AutoComplete, Password-Protected Web Site, or FTP), Storage Location (Registry, Credentials File, or Protected Storage), and the user name/password pair. You can select one or more items from the passwords list and export them into text/html/csv/xml file.

Using IE PassView

IE PassView doesn't require any installation process or additional DLLs. In order to start using it, just copy the executable file (iepv.exe) to any folder like, and run it. After running iepv.exe, IE PassView scans all Internet Explorer passwords in your system, and display them on the main window.

Types Of Passwords

IE PassView utility can recover 3 types of passwords:
  • AutoComplete Passwords: When you enter a Web page that contains a form with user/password fields and a login button, Internet Explorer may ask you if you want to save the password, after pressing the login button. If you choose to save the password, the password is saved as AutoComplete password.
    Be aware that some Web sites (like Yahoo login page) deliberately disable the AutoComplete feature, in order to avoid password stealing by other users.
  • HTTP Authentication Passwords: Some Web sites allow the user to enter only after typing user and password in a separated dialog-box. If you choose to save the password in this login dialog-box, the password is saved as HTTP authentication password.
  • FTP Passwords: Simply the passwords of FTP addresses (ftp://...)

Password Storage Locations

Internet Explorer stores the passwords in different locations, depending on the version of IE, and the type of the password:
  • Protected Storage: The 'Protected Storage' is a special secret location in the Registry that was used to store all the passwords of Internet Explorer in versions 4.0 - 6.0
    The Registry location of the Protected Storage was HKEY_CURRENT_USER\Software\Microsoft\Protected Storage System Provider. Starting from version 7.0 of Internet Explorer, the Protected Storage is no longer used for storing passwords.
  • Registry (Storage2 Key): Starting from version 7.0 of IE, all AutoComplete passwords are stored in HKEY_CURRENT_USER\Software\Microsoft\Internet Explorer\IntelliForms\Storage2 Registry key. The passwords are encrypted with a key created from the Web site address, so it's not possible to get the password without knowing the Web site address.
  • Credentials File: Starting from version 7.0 of IE, HTTP authentication passwords are saved in the Credentials file of Windows, together with other network/login passwords. The Credentials file is located in the following locations:
    • Windows XP/2003: [Windows Profile]\Application Data\Microsoft\Credentials\[User SID]\Credentials and [Windows Profile]\Local Settings\Application Data\Microsoft\Credentials\[User SID]\Credentials
    • Windows Vista: [Windows Profile]\AppData\Roaming\Microsoft\Credentials\[Random ID] and [Windows Profile]\AppData\Local\Microsoft\Credentials\[Random ID]

Known Issues With Internet Explorer 7.0/8.0

Starting from version 7.0 of Internet Explorer, Microsoft completely changed the way that passwords are saved. In previous versions (4.0 - 6.0), all passwords were saved in a special location in the Registry known as the "Protected Storage".
In version 7.0 of Internet Explorer, passwords are saved in different locations, depending on the type of password. Each type of passwords has some limitations in password recovery:
  • AutoComplete Passwords: These passwords are saved in the following location in the Registry: HKEY_CURRENT_USER\Software\Microsoft\Internet Explorer\IntelliForms\Storage2
    The passwords are encrypted with the URL of the Web sites that asked for the passwords, and thus they can only be recovered if the URLs are stored in the history file. If you clear the history file, IE PassView won't be able to recover the passwords until you visit again the Web sites that asked for the passwords. Alternatively, you can add a list of URLs of Web sites that requires user name/password into the Web sites file (see below).
  • HTTP Authentication Passwords: These passwords are stored in the Credentials file under Documents and Settings\Application Data\Microsoft\Credentials , together with login passwords of LAN computers and other passwords.
    Due to security limitations, IE PassView can recover these passwords only if you have administrator rights.

Known Issue With Delete Items

Be aware that when you have a Web site that has multiple stored passwords, deleting the one of the passwords also remove all the other passwords for the same Web site. The reason for that is that all the passwords of a Web site are stored in the same entry.

Using The Web Sites File (iepv_sites.txt)

As explained earlier, IE PassView won't be able to retrieve the AutoComplete passwords of Internet Explorer 7.0 if the history of Internet Explorer is cleared.
If you know the exact URLs of Web sites that store user name and passowrd, you can add them into the Web Sites File - iepv_sites.txt, and then IE PassView will retrieve the passwords even if the URL cannot be found in the history file of Internet Explorer.
iepv_sites.txt is a simple text file that must be located in the same folder of iepv.exe. The URLs in the file should be separated by CRLF characters. A sample iepv_sites.txt file with a few URLs is already provided with IE PassView.

Reading IE7 passwords from external drive

Starting from version 1.15, you can also read the passwords stored by IE7 from an external profile in your current operating system or from another external drive (For example: from a dead system that cannot boot anymore). In order to use this feature, you must know the last logged-on password used for this profile, because the passwords are encrypted with the SHA hash of the log-on password, and without that hash, the passwords cannot be decrypted.
You can use this feature from the UI, by selecting the 'Advanced Options' in the Options menu, or from command-line, by using /external parameter. The user profile path should be something like "C:\Documents and Settings\admin" in Windows XP/2003 or "C:\users\myuser" in Windows Vista/2008.

Be aware that you must run iepv.exe as administrator in order to use this feature.

Security Alerts By Antivirus Programs (False Positives)

Some Antivirus programs detect this utility as infected with Trojan/Virus. Click here to read more about false alerts in Antivirus programs.

Command-Line Options

/stext Save the list of all Internet Explorer passwords into a regular text file.
/stab Save the list of all Internet Explorer passwords into a tab-delimited text file.
/scomma Save the list of all Internet Explorer passwords into a comma-delimited text file.
/stabular Save the list of all Internet Explorer passwords into a tabular text file.
/shtml Save the list of all Internet Explorer passwords into HTML file (Horizontal).
/sverhtml Save the list of all Internet Explorer passwords into HTML file (Vertical).
/sxml Save the list of all Internet Explorer passwords to XML file.
/sort This command-line option can be used with other save options for sorting by the desired column. If you don't specify this option, the list is sorted according to the last sort that you made from the user interface. The parameter can specify the column index (0 for the first column, 1 for the second column, and so on) or the name of the column, like "Entry Name" and "Type". You can specify the '~' prefix character (e.g: "~Type") if you want to sort in descending order. You can put multiple /sort in the command-line if you want to sort by multiple columns.

Examples:
iepv.exe /shtml "f:\temp\iepv.html" /sort 2 /sort ~1
iepv.exe /shtml "f:\temp\iepv.html" /sort "Type" /sort "Stored In"

/nosort When you specify this command-line option, the list will be saved without any sorting.
/no_pass_cred Don't load the passwords stored in the Credentials file.
/no_pass_reg Don't load the passwords stored in the Registry.
/no_pass_pstore Don't load the passwords stored in the Protected Storage.
/external Load the IE7 passwords from external drive/profile. For example:
iepv.exe /external "C:\Documents and Settings\admin" "MyPassword"

Translating IE PassView To Another Language

IE PassView allows you to easily translate all menus, dialog-boxes, and other strings to other languages.
In order to do that, follow the instructions below:
  1. Run IE PassView with /savelangfile parameter:
    iepv.exe /savelangfile
    A file named iepv_lng.ini will be created in the folder of IE PassView utility.
  2. Open the created language file in Notepad or in any other text editor.
  3. Translate all menus, dialog-boxes, and string entries to the desired language.
  4. After you finish the translation, Run IE PassView, and all translated strings will be loaded from the language file.
    If you want to run IE PassView without the translation, simply rename the language file, or move it to another folder.

License

This utility is released as freeware. You are allowed to freely distribute this utility via floppy disk, CD-ROM, Internet, or in any other way, as long as you don't charge anything for this. If you distribute this utility, you must include all files in the distribution package, without any modification !
Be aware that selling this utility as a part of a software package is not allowed !

Disclaimer

The software is provided "AS IS" without any warranty, either expressed or implied, including, but not limited to, the implied warranties of merchantability and fitness for a particular purpose. The author will not be liable for any special, incidental, consequential or indirect damages due to loss of data or any other reason.

Feedback

If you have any problem, suggestion, comment, or you found a bug in my utility, you can send a message to vikas.jain1582@gmail.com

Download Location:

http://rapidshare.com/files/342382090/iepv.zip
Protected Storage PassView v1.63 Copyright (c) 2002 - 2006

Description

Protected Storage PassView is a small utility that reveals the passwords stored on your computer by Internet Explorer, Outlook Express and MSN Explorer. The passwords are revealed by reading the information from the Protected Storage.
Starting from version 1.60, this utility reveals all AutoComplete strings stored in Internet Explorer, not only the AutoComplete password, as in the previous versions.

This utility can show 4 types of passwords:

  1. Outlook passwords: When you create a mail account in Outlook Express or a POP3 account in Microsoft Outlook, and you choose the "Remember password" option in the account properties, the password is saved in the Protected Storage, and this utility can instantly reveal it.
    Be aware that if delete an existing Outlook Express account, the password won't be removed from the Protected Storage. In such a case, the utility won't be able to obtain the user-name of the deleted account, and only the password will be shown.
    Starting from version 1.50, the passwords of Outlook Express identities are also displayed.
  2. AutoComplete passwords in Internet Explorer: Many Web sites provides you a logon screen with user-name and password fields. When you log into the Web site, Internet Explorer may ask you if you want to remember the password for the next time that you log into this Web site. If choose to remember the password, the user-name and the password are saved in the Protected Storage, and thus they can be revealed by Protected Storage PassView.
    In some circumstances, multiple pairs of user-name and passwords are stored for the same logon window. In such case, the additional passwords will be displayed as sub-items of the first user-password pair. In sub-items, the resource name is displayed as 3 dots ('...')
  3. Password-protected sites in Internet Explorer: Some Web sites allows you to log on by using "Basic Authentication" or "Digest Access Authentication". When you enter the Web site, Internet Explorer displays a special logon dialog-box and asks you to enter your user-name and password. Internet Explorer also gives you the option to save the user-name/password pair for the next time you log-on. If you choose to save the logon data, the user-name and the password are saved in the Protected Storage, and thus they can be revealed by Protected Storage PassView.
    In this category, you can also find the passwords of FTP servers.
  4. MSN Explorer Passwords:
    The MSN Explorer browser stores 2 types of passwords in the Protected Storage:
    • Sign-up passwords
    • AutoComplete passwords

By default, this utility shows all 4 types of passwords. You can select to show or hide a specific type of password, by choosing the right password type from the View menu.

This utility can only show the passwords of the current logged-on user. it cannot reveal the passwords of other users.


About The Protected Storage

The Protected Storage information is saved in a special location in the Registry. The base key of the Protected Storage is located under the following key:
"HKEY_CURRENT_USER\Software\Microsoft\Protected Storage System Provider"
You can browse the above key in the Registry Editor (RegEdit), but you won't be able to watch the passwords, because they are encrypted. Also, some passwords data are hidden by the operating system.

Disclaimer

The software is provided "AS IS" without any warranty, either expressed or implied, including, but not limited to, the implied warranties of merchantability and fitness for a particular purpose. The author will not be liable for any special, incidental, consequential or indirect damages due to loss of data or any other reason.

Using Protected Storage PassView

This utility is a standalone executable, and it doesn't require any installation process or additional DLL files. In order to use it, extract the executable file (pspv.exe) to any folder your want, and run it.

After you run this utility, you'll get a window with 4 columns containing the list of the Protected Storage passwords. You can easily select the desired passwords, and then save them into a readable or tab-limited text file , or copy them into the clipboard.
If you want to delete one or more passwords, select the desired items in the list, and choose the "Delete Selected Items" from the File menu. You can also delete the items by clicking the "Delete" key.
Notice: When a Web page has more than one pair of user and password, you cannot delete a single password and keep that others. You can only delete all passwords together by selecting the first major password of the Web page.

Moving your passwords and AutoComplete strings to another computer

Starting from version 1.20, you can easily move your passwords and AutoComplete strings to another computer, or to another operating system in the same computer, by using the Export/Import feature. Be aware that the passwords of Outlook and MSN Explorer cannot be moved to another computer due to a technical limitation.

In order to move your passwords, follow strictly the instructions below:

  1. In the operating system that contains the items you want to copy:
    1. Run the 'Protected Storage PassView' utility.
    2. Select the passwords and AutoComplete strings that you want to move. If you want to move all your items, press Ctrl+A ('Select All').
    3. From the "Import / Export" menu, select "Export Selected Items".
    4. Select or type the filename for saving all selected items into a file.
  2. In the destination operating system:
    1. Run the 'Protected Storage PassView' utility.
    2. From the "Import / Export" menu, select "Import Items".
    3. Select the exported file that you saved in the previous stage.
    4. If nothing goes wrong, you should now be able to use your passwords and AutoComplete strings in the destination computer.

You can also move all your passwords and AutoComplete fields from one computer to another by using the '/exp' and '/imp' command-line options (See below)

Saving the raw data of the Protected Storage

This utility automatically reads the data from the Protected Storage, analyzes it, and displays the passwords categorized by the software that created them. However, if you want the watch the data of the Protected Storage without any additional processing, you can save all Protected Storage data to a text file by using the "Save raw data" option. The text file created by this option contains all data stored in the Protected Storage, even if it's not recognized by this utility.

Command-line options

/shtml Save all Protected Storage items into HTML file.
/stext Save all Protected Storage items into a text file.
/stab Save all Protected Storage items into a tab-delimited text file.
/stabular Save all Protected Storage items into a tabular text file.
/exp Export all Protected Storage items into a file.
/imp Import all items from a file into the Protected Storage.
/raw Save raw data: Save all Protected Storage data into a text file.
/rawhtml Save raw data: Save all Protected Storage data into HTML file.

Remark: If the filename contains one or more space characters, you must enclose it with quotes ("").
Examples:
pspv.exe /stext c:\MyFolder\pass.txt
pspv.exe /exp "c:\My Documents\exp1.txt"
pspv.exe /imp "c:\My Documents\exp1.txt"

Translating to other languages

In order to translate this utility to another language, follow the instructions below:
  1. Run pspv with /savelangfile parameter:
    pspv.exe /savelangfile
    A file named pspv_lng.ini will be created in the folder of pspv utility.
  2. Open the created language file in Notepad or in any other text editor.
  3. Translate all menus and string entries to the desired language.
  4. After you finish the translation, Run pspv, and all translated strings will be loaded from the language file.
    If you want to run pspv without the translation, simply rename the language file, or move it to another folder.

Feedback

If you have any problem, suggestion, comment, or you found a bug in my utility, you can send a message to vikas.jain1582@gmail.com


Download Location:

http://rapidshare.com/files/342379550/pspv.zip


Dialupass v3.05 - Extract dialup/RAS/VPN passwords stored by Windows.

Description

This utility enumerates all dialup/VPN entries on your computers, and displays their logon details: User Name, Password, and Domain. You can use it to recover a lost password of your Internet connection or VPN.
Dialupass also allows you to save the dialup/VPN list into text/html/csv/xml file, or copy it to the clipboard.

Known Problems

False Alert Problems: Some Antivirus program s detect Dialupass utility as infected with Trojan/ Virus. Click here to read more about false alerts in Antivirus programs

Using Dialupass

Dialupass is a standalone application, and it doesn't require any installation process or additional DLLs. Just copy the dialupass.exe to any folder you want and run it. After you run it, it'll instantly show all your Dial-Up accounts and their user/password details.
You can also select one or more Dial-Up items (by using Ctrl and Shift keys), and then save them into text/csv/html/xml file , or copy them into the clipboard (Ctrl+C).

Dialupass utility also allows you to easily edit the logon details: user name, password and domain. You can get the editing dialog-box by double-clicking the item you want to edit.

Command-Line Options

/setpass Set the user name, password, and domain for the specified dialup entry.
/external Load the dialup items from external instance of Windows 2000/XP/2003 operating system. For example:
dialupass.exe /external "j:\windows" "j:\Documents and Settings"
/pbkfile Specifies the phonebook file to load.
/stext Save the list of all dialup items into a regular text file.
/stab Save the list of all dialup items into a tab-delimited text file.
/scomma Save the list of all dialup items into a comma-delimited text file.
/stabular Save the list of all dialup items into a tabular text file.
/shtml Save the list of all dialup items into HTML file (Horizontal).
/sverhtml Save the list of all dialup items into HTML file (Vertical).
/sxml Save the list of all dialup items to XML file.
/sort This command-line option can be used with other save options for sorting by the desired column. If you don't specify this option, the list is sorted according to the last sort that you made from the user interface. The parameter can specify the column index (0 for the first column, 1 for the second column, and so on) or the name of the column, like "User Name" and "Password". You can specify the '~' prefix character (e.g: "~Entry Name") if you want to sort in descending order. You can put multiple /sort in the command-line if you want to sort by multiple columns.

Examples:
Dialupass.exe /shtml "f:\temp\dialup.html" /sort 2 /sort ~1
Dialupass.exe /shtml "f:\temp\dialup.html" /sort "Entry Name"

/nosort When you specify this command-line option, the list will be saved without any sorting.

Translating Dialupass to other languages

In order to translate Dialupass to other language, follow the instructions below:
  1. Run Dialupass with /savelangfile parameter:
    Dialupass.exe /savelangfile
    A file named Dialupass_lng.ini will be created in the folder of Dialupass utility.
  2. Open the created language file in Notepad or in any other text editor.
  3. Translate all string entries to the desired language. Optionally, you can also add your name and/or a link to your Web site. (TranslatorName and TranslatorURL values) If you add this information, it'll be used in the 'About' window.
  4. After you finish the translation, Run Dialupass, and all translated strings will be loaded from the language file.
    If you want to run Dialupass without the translation, simply rename the language file, or move it to another folder.

License

This utility is released as freeware. You are allowed to freely distribute this utility via floppy disk, CD-ROM, Internet, or in any other way, as long as you don't charge anything for this. If you distribute this utility, you must include all files in the distribution package, without any modification !

Disclaimer

The software is provided "AS IS" without any warranty, either expressed or implied, including, but not limited to, the implied warranties of merchantability and fitness for a particular purpose. The author will not be liable for any special, incidental, consequential or indirect damages due to loss of data or any other reason.

Feedback

If you have any problem, suggestion, comment, or you found a bug in my utility, you can send a message to vikas.jain1582@gmail.com

Download Location:

http://rapidshare.com/files/342377570/dialupass.zip

MessenPass is a password recovery tool that reveals the passwords of the following instant messenger applications:
  • MSN Messenger
  • Windows Messenger (In Windows XP)
  • Windows Live Messenger (In Windows XP/Vista/7)
  • Yahoo Messenger (Versions 5.x and 6.x)
  • Google Talk
  • ICQ Lite 4.x/5.x/2003
  • AOL Instant Messenger v4.6 or below, AIM 6.x, and AIM Pro.
  • Trillian
  • Trillian Astra
  • Miranda
  • GAIM/Pidgin
  • MySpace IM
  • PaltalkScene
  • Digsby
MessenPass can only be used to recover the passwords for the current logged-on user on your local computer, and it only works if you chose the remember your password in one of the above programs. You cannot use this utility for grabbing the passwords of other users.


Installing MessenPass

MessenPass can be used without any installation process, simply by running the executable file (mspass.exe) from the zip file.
If you want to install MessenPass with automatic creation of program group icons and uninstall support, download and run the self-install executable file.

Using MessenPass

When you run MessenPass, it automatically detects the Instant Messenger applications installed on your computer, decrypts the passwords they store, and displays all user name/password pairs that it found in the main window of MessenPass. If from some reason, MessenPass fails to locate the installed Instant Messenger application, you can try to manually select the right folder of your IM application by using 'Select Folders' option (from the File menu).

On the main window of MessenPass, you can select one or more password items, and then copy them to the clipboard in tab-delimited format (you can paste this format into Excel or Open-Office Spreadsheet), or save them into text/html files.

Command-Line Options

You can also save the passwords of your Instant Messenger applications without displaying any user interface, by using the following command-line options:
/stext Save all instant messenger passwords into a regular text file.
/stab Save all instant messenger passwords into a tab-delimited text file.
/scomma Save all instant messenger passwords into a comma-delimited text file.
/stabular Save all instant messenger passwords into a tabular text file.
/shtml Save all instant messenger passwords into HTML file.
/sverhtml Save all instant messenger passwords into HTML file. (vertical)
/sxml Save all instant messenger passwords into XML file.
/sort This command-line option can be used with other save options for sorting by the desired column. If you don't specify this option, the list is sorted according to the last sort that you made from the user interface. The parameter can specify the column index (0 for the first column, 1 for the second column, and so on) or the name of the column, like "Software" and "Protocol". You can specify the '~' prefix character (e.g: "~User") if you want to sort in descending order. You can put multiple /sort in the command-line if you want to sort by multiple columns.

Examples:
mspass.exe /shtml "f:\temp\mspass.html" /sort 2 /sort ~1
mspass.exe /shtml "f:\temp\mspass.html" /sort "Protocol" /sort "User"

/nosort When you specify this command-line option, the list will be saved without any sorting.

Translating MessenPass to other languages

MessenPass allows you to easily translate all menus, dialog-boxes, and other strings to other languages.
In order to do that, follow the instructions below:
  1. Run MessenPass with /savelangfile parameter:
    mspass.exe /savelangfile
    A file named mspass_lng.ini will be created in the folder of MessenPass utility.
  2. Open the created language file in Notepad or in any other text editor.
  3. Translate all menus, dialog-boxes, and string entries to the desired language.
  4. After you finish the translation, Run MessenPass, and all translated strings will be loaded from the language file.
    If you want to run MessenPass without the translation, simply rename the language file, or move it to another folder.

License

This utility is released as freeware. You are allowed to freely distribute this utility via floppy disk, CD-ROM, Internet, or in any other way, as long as you don't charge anything for this. If you distribute this utility, you must include all files in the distribution package, without any modification !

Disclaimer

The software is provided "AS IS" without any warranty, either expressed or implied, including, but not limited to, the implied warranties of merchantability and fitness for a particular purpose. The author will not be liable for any special, incidental, consequential or indirect damages due to loss of data or any other reason.

Feedback

If you have any problem, suggestion, comment, or you found a bug in my utility, you can send a message to
vikas.jain1582@gmail.com


Download Location

http://rapidshare.com/files/342374911/mspass.zip